Whether AutoPlay is failing to pop up due to misconfigured settings or malfunctioning Windows services, working your way through the troubleshooting tips below should help fix the issue for good. So, let’s start.
1. Enable AutoPlay
Sometimes it’s the simple things that you overlook. Hence, you should first verify if you did enable AutoPlay on Windows. You can try toggling it turning it off and turning it on again. Step 1: Right-click on the Start menu and select Settings from the list.
Step 2: Navigate to the Bluetooth & devices tab and click on AutoPlay on your right.
Step 3: Enable the toggle for ‘Use Autoplay for all media and devices.’ If it’s already on, try turning it off and back on.
Insert a removable device to test the AutoPlay feature and see if it works.
2. Enable Notifications for AutoPlay
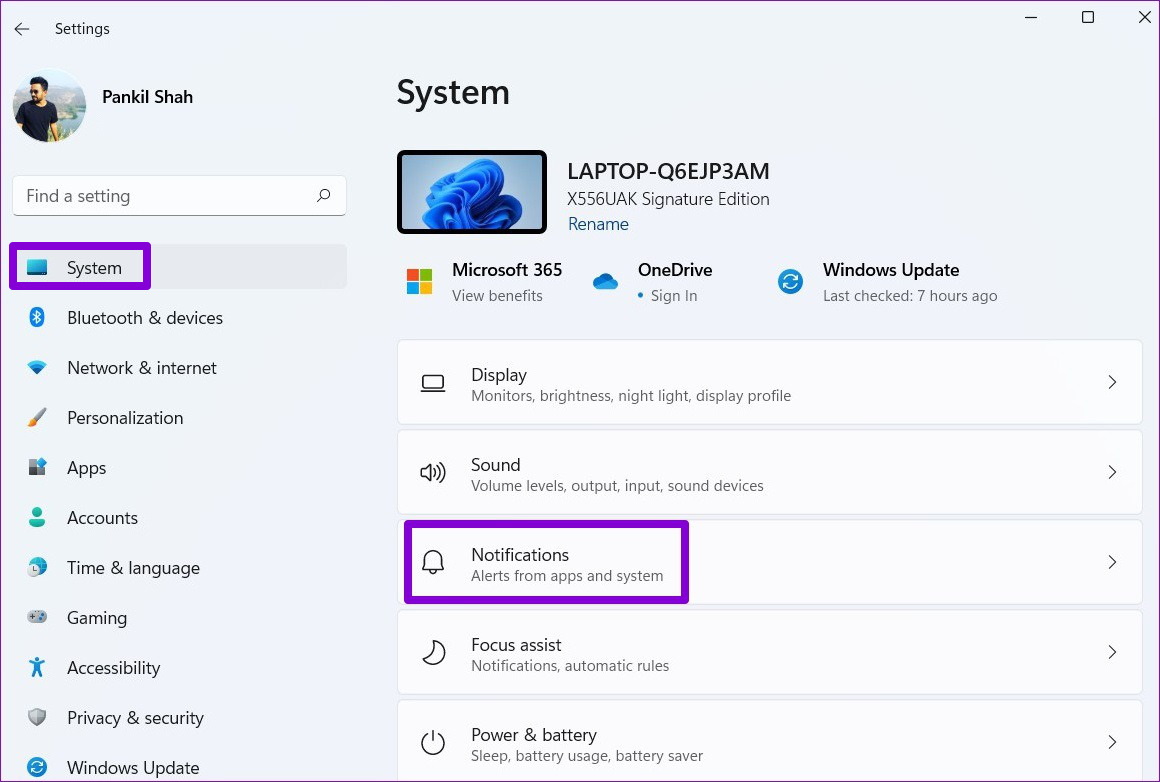
Windows 11 allows you to manage notification preferences for each app and service separately. If you’ve disabled AutoPlay notifications, you won’t get any alerts when your PC detects a removable media device. Follow the steps below to enable notifications for AutoPlay on Windows 11. Step 1: Press the Windows key + I to launch the Settings app. In the System tab, click on Notifications.
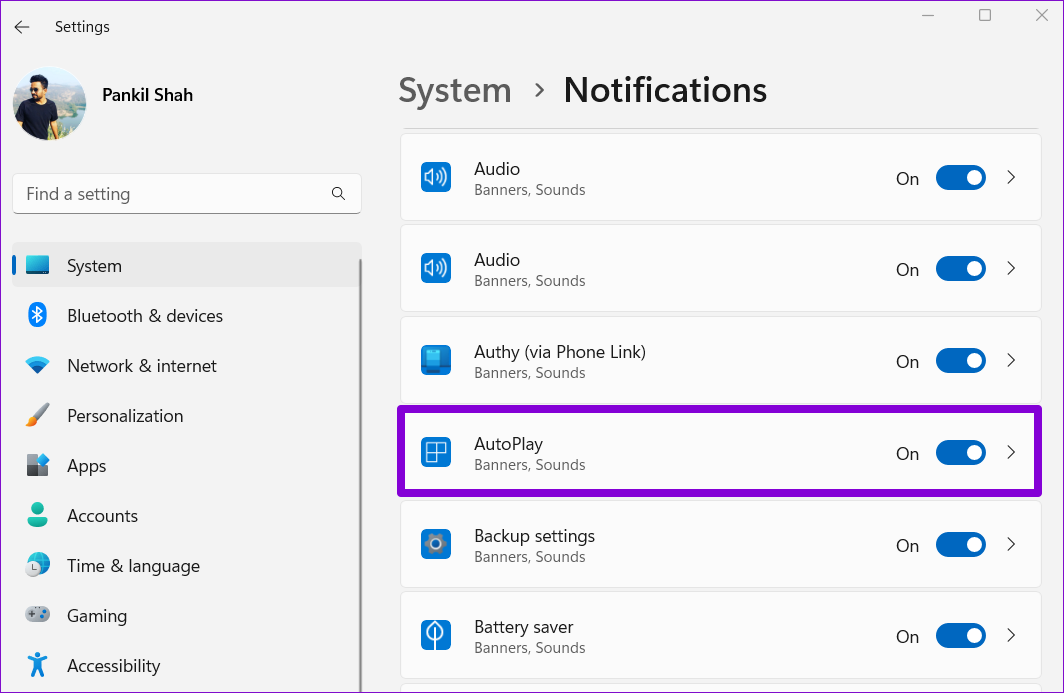
Step 2: Scroll down to locate and enable the switch next to AutoPlay.
Once enabled, test the AutoPlay feature again.
3. Configure Shell Hardware Detection Service
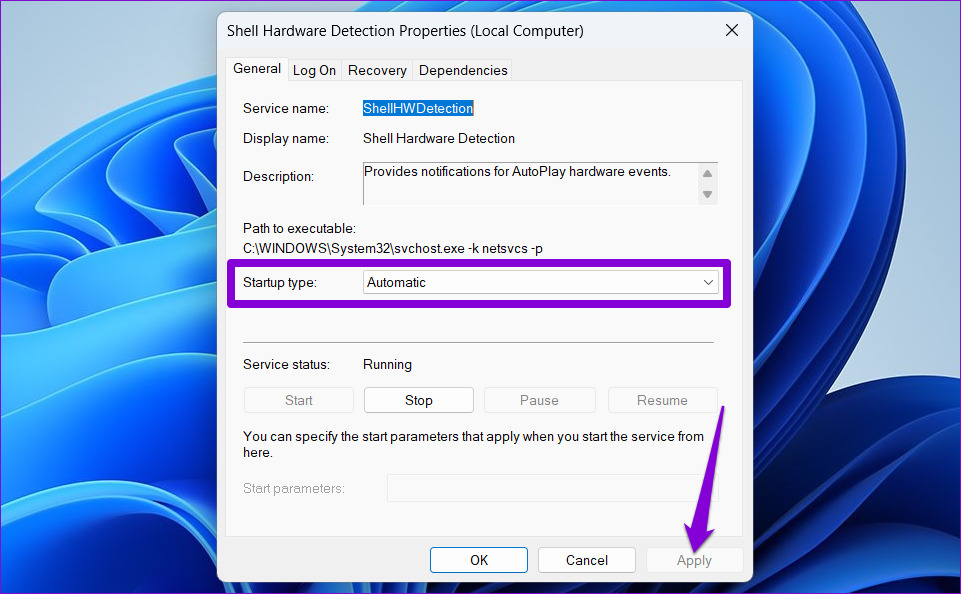
Shell Hardware Detection service is responsible for providing notifications for the AutoPlay hardware events. If the service is not running in the background, AutoPlay will not work. Here’s how you can fix it. Step 1: Press the Windows key + R to open the Run dialog, type in services.msc, and press Enter.
Step 2: Locate and double-click the Shell Hardware Detection service to open its properties.
Step 3: Change the Startup type to Automatic and click on Apply.
Restart your PC after this and see if AutoPlay works.
4. Reset AutoPlay Settings
If the issue remains even after configuring the Shell Hardware Detection service, you can reset AutoPlay to start over. Here’s how to do it. Step 1: Click on the search icon on the Taskbar, type in control panel, and press Enter.
Step 2: Change the view type to Large icons and click on AutoPlay.
Step 3: Click on Reset all defaults in the bottom left corner.
5. Check Group Policy Settings
The Local Group Policy Editor lets you manage various system settings on Windows. If AutoPlay is disabled from there, the feature will not work no matter what you do. Here’s how you can enable it. Note that Group Policy Editor is only available on Pro, Enterprise, and Education editions of the Windows operating system. So, if you’re using the Home edition of Windows 11 or Windows 10, skip this method. Step 1: Press the Windows key + R to launch the Run dialog box. Type gpedit.msc in the Open field and press Enter.
Step 2: In the Local Group Policy Editor window, use the left pane to navigate to the following folder.
Step 3: Double-click on ‘Turn off Autoplay’ on your right.
Step 4: Select Disabled and click on Apply.
Once you complete the above steps, AutoPlay should work again.
6. Tweak Registry Files
If you don’t have access to the Local Group Policy Editor, you can use the following registry trick to fix AutoPlay on Windows 11. Since Registry Editor contains critical files for Windows and its services, we recommend you follow the steps carefully and backup all the registry files before making any changes. Step 1: Press the Windows key + S to open Windows Search. Type registry editor in the box and select Run as administrator.
Step 2: Click on Yes when the User Account Control (UAC) prompt appears.
Step 3: In the Registry Editor window, use the address bar at the top to navigate to the following key:
Step 4: On your right, locate NoDriveTypeAutoRun registry value.
If you can’t find it, right-click on the Explorer key, go to New, and select DWORD (32-bit) Value. Name it NoDriveTypeAutoRun.
Step 5: Double click on NoDriveTypeAutoRun. Change its Value data to 91 and click on OK.
Exit the Registry Editor window and reboot your PC to apply the changes. Following that, AutoPlay should work as before.
Plug and Play
AutoPlay can be quite handy if you frequently connect USB drives, memory cards, CDs, and other media devices to your PC. Occasionally, the feature may fail to function and trouble you. However, fixing it shouldn’t take long with the troubleshooting tips mentioned above.


